A beginner's guide to using Replit’s online code editor and development environment
Learn how to get started with Replit’s online code editor and development environment
Table of contents
- Introduction:
- Creating a free Riplit account
- Creating and saving a project in Replit.
- Basic Features of the Replit Editor: the Tools
- Adding a Custom Domain in Replit
- Publishing Your Project in Replit
- How to Share Replit Project URLs
- How to Invite Others to Edit Your Repls
- Replit Paid Subscription: Features and Benefits
- Conclusion
Introduction:
What is Replit? Replit is an online code editor and development environment that allows you to write, run, and deploy your code all in one place. It has support for over 50 languages. Yes, it’s a fantastic platform for beginners who are just starting to learn how to code and experienced developers looking for a powerful yet easy-to-use tool. In this piece of writing, I’ll cover
Creating a free Riplit account
To get started, you first need to head to the Replit page. Click on the “Sign Up” button located in the upper right-hand corner of the page.

You’ll be prompted to create a Replit account. You can do this by signing up with your Google or GitHub account or by entering your email address and creating a password.

If you opt to sign up using your email address, you must click the link Replit sends you to confirm your email address.
Once you verify your email address, you’ll be taken to the Replit dashboard.

Creating and saving a project in Replit.
A project in Replit is called Repl, which stands for read-eval-print-loop, and it's an interactive programming environment for developers to create projects.
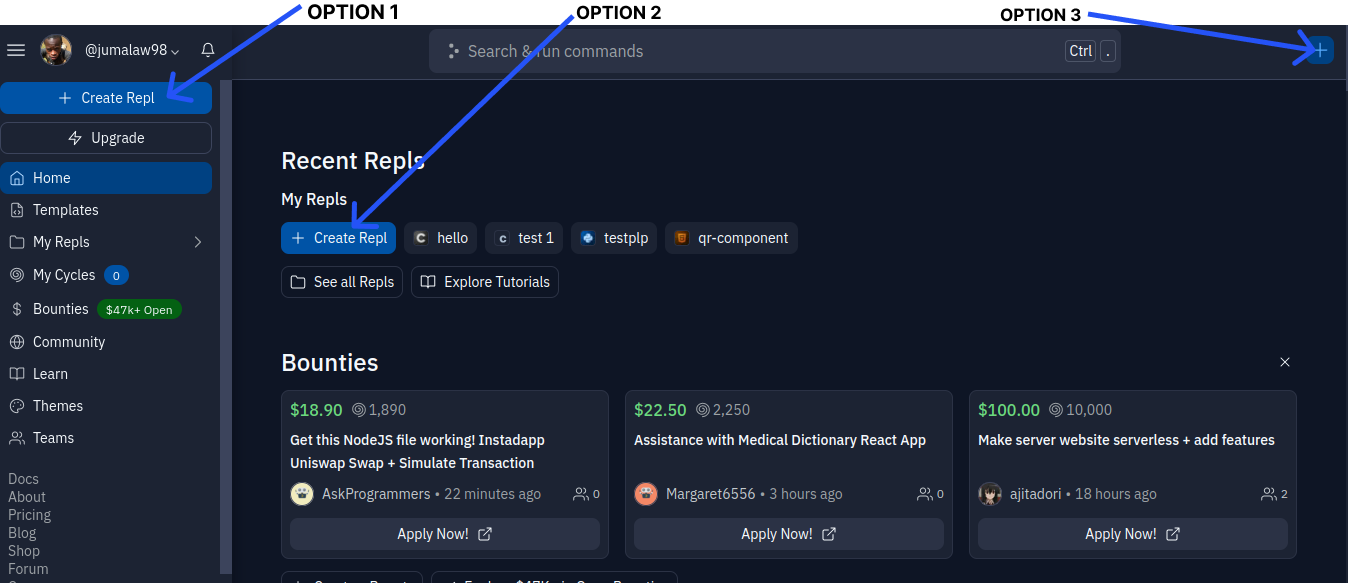
On the Replit dashboard, there are three places you can use to create new repls.
Option 1: Click on the Create Repl button that is in the top left-hand corner of the home page.
Option 2: You can create a reply by clicking Create Repl on the Recent Repl dashboard.
Option 3: by clicking the + icon located at the upper right-hand corner.

Then you can choose from any of Replit's templates, including Python, Node, Java, HTML and CSS, Ruby, and more, or choose to start a black Repl.

Once you have chosen your language, add the name of your project.
For the free version of Replit, you’re only allowed to create public projects. If you need private repos, you need to upgrade to a paid subscription.

Once you're done naming your repl, click on the create repl button. Next, it should take you to the editor interphase.

Basic Features of the Replit Editor: the Tools
Here are some of the basic features of the replit editor:
Replit Code Editor:
This is the main window where you write your code. The replit editor supports a wide range of programming languages, including Python, JavaScript, Ruby, and others.
The editor also includes features such as syntax highlighting, auto-intention, and auto-completion.

Replit File Explorer
The file explorer is a navigation panel that allows you to view and manage your files and folders. You can create new files, rename them, move them, and delete them from the file explorer.

Version Control in Replit
Version control is an important part of software development because it allows developers to keep track of changes and cooperate more effectively. Replit offers version control tools that make it simple for users to keep track of and manage code changes.
The Git version control system is used in Replit to maintain versions of files. Git is a popular and effective version control tool that enables developers to monitor changes made to their code. Replit incorporates Git, making it simple for users to track and manage their code versions.
Making Modifications to Your Existing Code: In order to create a new version of your code, you must make modifications to your current code. After making the necessary changes, commit the modifications to generate a new version of your code. On the Replit interface's left side, select the Git symbol to commit changes. By doing so, the Git panel will open, allowing you to examine your modifications and commit them to a new version.
Replit makes it simple to inspect earlier iterations of your code. Simply select the "Commits" tab from the Git panel to accomplish this. When you do this, a list of all the previous iterations of your code will appear, along with a description of the modifications made in each one. Any version can be clicked to view the code for that particular version.
Reverting Changes: Replit makes it simple to go back to a previous version of your code if you make a mistake or decide to do so. Simply click the "Revert" button next to the version you wish to return to in order to undo changes. Your code will go back to the chosen version if you do this.
Collaboration: Replit's version control system makes it simple to work on code projects with other people. With Replit, you can invite others to work with you on your code and manage their levels of access. This makes it simple to collaborate on challenging projects with others and keep track of the modifications made by each team member.
Replit Packages
Installing packages in Replit: a step-by-step
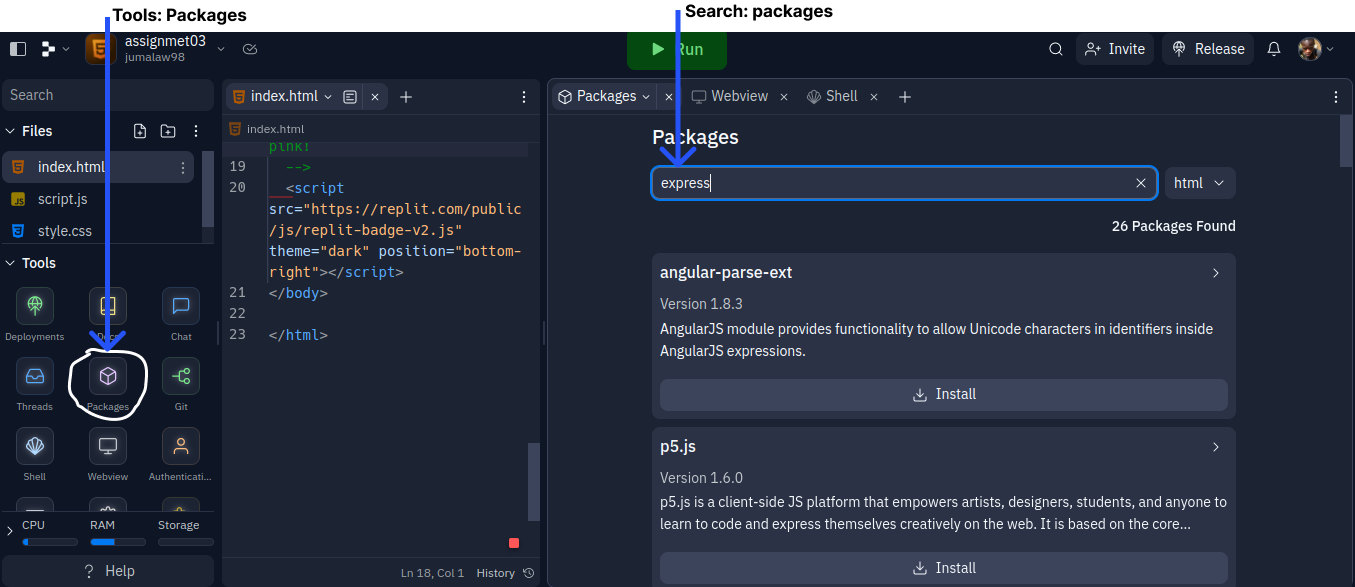
When working with code on Replit, you likely need to install packages or libraries like Express, Cors, or Morgan to extend the functionality of the project. Installing packages in Replit is a straightforward process that can be done in just a few steps. Here’s a step-by-step guide to installing packages.
Open the package manager. On the left-hand navigation bar of the Replit editor, you’ll see a tab labeled “Packages.” Click on this tab to open the package manager.
Search for the package you want to install:
On the package manager, you can search for packages by name or keyword. Type in the name of the packages you want to install and hit “Enter” to search.
Install the package:
Once you have found the package you want to install, click the “➕” button to add it to your project. This will install the packages in your Replit project.
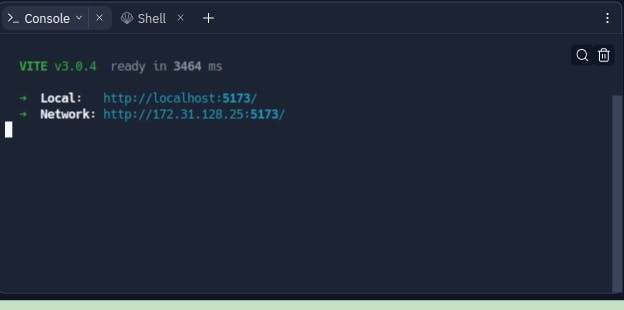
Inside the console, on the right-hand side of the screen, you should see the package being installed.
Import the packages:
Once the package is installed, you’ll need to import it into your code. The method for importing packages will vary depending on the programming language you’re using.
Save your code:
After installing and importing your packages, be sure to save your code to ensure that changes are saved to your Replit project.

Replit Settings
Customizing Replit Settings: A Step-by-Step Guide
If you need to customize the editor settings of your project, click on the setting icon on the left side of the editor.
Replit, being a powerful editor, offers a wide range of customization options to help you tailor your environment to your needs. Whether you want to change the appearance of the editor, adjust the keybinding, or configure the environment for a specific programming language, here is a simple guide.
Open the setting menu: In the left-hand navigation bar of the Replit editor, you'll see a label labeled "Settings.” Click on the tab to open up the setting menu.
Adjust appearance: In the "appearance” section of the settings menu, you can adjust the theme, font size, and another visual session to suit your preferences.
Configure keybinding: In the “keybinding” section of the menu, you can configure the keybinding for the editor to match your preferred shortcuts.
Customizing language settings: In the “Language” section of the settings menu, you can configure the environment for a specific programming language by adjusting settings such as the compiler and runtime environment.
Save your settings: After you have made your customization, be sure to save your settings to ensure that they are applied to your Replit project.

Replit Database
A Comprehensive Guide to Storing and Accessing Data
As a developer, you know that managing data is a critical part of any project. Fortunately, Replit offers a powerful solution for storing and accessing data: the Replit Database. With the Replit database, you can easily store data from your project and access it from anywhere, making it an essential tool for web development, and other applications.
What is the Replit Database?
The Replit Database is a cloud-based database that allows you to store data from your project. The data is fully managed, meaning that as a developer, you don't have to worry about setting up servers or managing backups. Instead, you can focus on using the database to store and access data for your project.
How to Use the Replit Database
Import the database: To get started, you’ll need to import the Replit database into your project. You can do this by clicking on the “Packages” tab in the left-hand navigation bar and searching for “replitdb-python” (if using PPython) or “replitdb-client” (if you’re using JavaScript).
Connect the database: once you’ve imported the database, you’ll need to connect to it. You can do this by using the “connect” function in the “replit” module (if you’re using Python) or the “ReplitDBClient” constructor (if you’re using JavaScript).
Store and access data: once connected to the database, you can start storing and accessing data. To store data, you can use the “set” function in the “replit” module (using Python) or the “set” on the “ReplitDBClient” object (if you’re using JavaScript). To access data, you can use the “get” function in the “replit” module (if you're using Python) or the “get” method on the “ReplitDBClient” object (if using JavaScript).
Benefits of Using the Replit Database
The Replit Database offers several benefits over other database solutions, including;
Easy to use: the Replit Database is simple and intuitive, making it easy for developers of all levels to use.
Scalable: the database is fully managed, meaning that it can scale to handle a large amount of data.
Accessible: because the database is cloud-based, you can access your data from anywhere with an internet connection.
Whether building a web app or any other application, the Replit Database is a powerful tool that can help you manage your data and take your project to the next level.
To learn more about the Replit Database, please visit the documentation
Unit Testing in the Replit Guide
Unit testing is an essential part of the development process. This helps to ensure that your code is functioning as intended and can catch potential bugs before they become bigger issues. With Replit, adding unit tests to your project is easy.
What are unit tests?
Unit tests are automated tests that check that individual units of code (such as functions or methods) are working correctly. They are often created by developers and executed automatically throughout the development process to quickly identify mistakes.
How to create a unit test in Replit
Here are a few steps on how to add a unit test to your Replit project.
Create a test file: create a new file in your project and name it something like “test.py” or "test.js,” depending on the programming language you’re using.
Write your unit tests: In your test file, import the code you want to test and write your tests. Use this information to check that the code is working as expected. For example, in Python, you might use the “assert’ statement to check that the function returns the expected value.
Run your tests: to run your tests, use a testing framework like ‘unit test’ (for Python) or ‘jest’ (for JavaScript). In Replit, you can run your test directly from the console by typing
python -m unit-test my_module _test.pyorjest my_module_test.jsInterpret your test results: after running your test, the testing framework will give you a report on which tests passed and which ones failed. Use this information to fix any issues and ensure your code is working as intended.
Benefits of Unit Tests in Replit
Adding unit tests to your replit project offers several benefits, including:
Early bug detection: Unit tests catch errors early in the development process before they become larger issues.
Saving time: unit tests can save time by automating the testing process and reducing the need for manual testing.
Improving code quality: Unit tests help ensure that your code is high quality and reliable.
Confidence in code changes: running a test after making changes to your code gives you confidence that the changes didn’t break existing functionality.
Code documentation: writing unit tests forces you to think about how your code works, making it a form of documentation.
The Run Button on Replit
How do I use it?
One of the most essential features of the Replit is the Run Button. With the Tun button, you can quickly run your code and see the output.
What is the "run" button?
The Run button is a feature in Replit that allows you to run your code and see the output. It's located in the top center of the Replit editor and looks like a green arrow pointing to the right. When you click the Run button, Replit compiles and runs your code, and you can see the output in the console.

Other Options for Running Your Code
In addition to the Run button, there are other options for running your code in Replit:
Keyboard Shortcuts: You can use keyboard shortcuts to run your code quickly. For example, in Python, you can use the keyboard shortcut
Ctrl+Enterto run your current line of code.Run Menu: You can also use the “Run” menu in the top bar to run your code. This menu has options for running code in different ways, such as in debug mode or running a specific file.
Benefits of Using the Run Button
The Run button is an essential feature of Replit that makes it easy to run your code and see the output. It saves time and makes the development process more efficient. By using the Run button, you can quickly test your code and make sure it works as expected.
The Replit Console
The console and clearing the console
When working in Replit, you may find yourself with a lot of output on the console. The output can quickly become overwhelming, making it difficult to find the information you need. Fortunately, there is an easy way to clear the console in Replit.
What is the console?
Before you dive into how to clear the console, it's so essential to understand what the console is. The console is where you can see the output of your code. It's where error messages, print statements, and other outputs appear. The console is located at the bottom of the screen.
To clear the console if needed, click on the delete icon located on the right-hand side of the console window.

The shell console in Replit
The Replit Shell console is a powerful tool that allows you to run commands and perform tasks in a terminal-like environment.
What is the Replit Shell Console?
The Replit Shell Console is a command line interface that allows you to interact with your workspace using text-based commands. It's a powerful tool that helps you perform tasks quickly and efficiently, with no need for a graphical interface.

Basic Commands for the Replit Shell Console
Here are a few basic commands you can use to get started with the Replit Shell Console:
ls: This command lists all of the files and directories in your current working directory.
cd: This command allows you to change your current working directory. For example, to move into a directory called "my-directory," you would type cd my-directory.
mkdir: This command creates a new directory. For example, to create a directory called "new-directory," you would type mkdir new-directory.
rm: This command removes a file or directory. Be careful when using this command, as it can permanently delete files. For example, to remove a file called "my-file.txt," you would type rm my-file.txt.
Adding a Custom Domain in Replit
Replit provides a convenient and user-friendly way to create, host, and share your web application. By default, your Replit project will have an URL that looks something like https://project-name.username.repl.co: However, if you want to use your custom domain name, you can do so in his simple guide.
Option 1: You can add a custom domain for your project by clicking on the pencil icon next to the preview URL.

Then you can add your custom domain and CNAME information.

Publishing Your Project in Replit
Replit is an excellent platform for creating, hosting, and sharing web development projects. Once you're done creating your project, you can publish it and have it displayed in the collection of Replit apps.
A step-by-step guide to publishing your project in Replit
On your dashboard, there are a few ways to publish your project on Replit.
On your project name, click the dropdown arrow (1a), then click (1b) on the publish button.
or
By clicking the Release button on your right hand, publish your product.

The window below will appear after the publish button is used above. You will have to fill in a few details about the project before its publication.
Basic: here you'll update the project name and descriptive description of the project.
Tags: Name the programming language and technologies used in the project. This helps the user discover projects related to a specific language or technology.
Icon and cover page: the icon is a small image representing your project, and the cover page is a larger image that appears at the top of your project's page. It can be used to showcase your project and give users a preview of what your project is all about.
After you click on the "Publish" button, your project will be published and made publicly available on the Replit platform. You can then share the project's URL with others so they can view and interact with it.

How to Share Replit Project URLs
If you have created a project on Replit and want to share it with someone, this can be easily done by sharing the project URL.
Open the project you want to share.
Click on the “Web” tab at the top of the screen. This will take you to the web hosting settings for your project.
Copy the project URL: under the “web” tab, you will see the project URL listed.
Share the Project URL: You can now share the project URL with anyone you want to share the project with.

Additional tips
If you want to share the project with someone who doesn't have a Replit account, make sure you have set the project visibility to “Anyone can view.”
If you want to limit who can access your project, you can set project visibility to “Only people I choose can view." This will allow you to share the project URL with those whom you have permitted to access the project.
If you want to revoke access to the project at any time, you can change the project visibility setting or unpublish the project.
How to Invite Others to Edit Your Repls
Replit is an online editor and development environment that makes it easy to collaborate on coding projects, If you are working on a project with others, you can invite them to edit your repls so that you can work on the project together.
Invite Collaborators: On the dashboard, top-hand-right, you will see a
`invite`button. Here, you can invite others to edit your repl by entering their username or email address. You can also choose whether to give them read-only access or full editing access.Share the Link: You can also share the link with your repl by copying the link and sending it to others. This is useful if you want to share the repl with someone who does not have a Replit account.
Manage Collaborators: Once you have invited collaborators to your repl, you can manage their access by clicking on the "Manage" button in the share options. Here, you can remove collaborators or change their access level.

Additional Tips
If you want to collaborate on a project with someone who does not have a Replit account, they will need to create one before they can edit your repls.
You can also collaborate on projects with others by using the live coding feature in Replit, which allows you to code together in real time.
Be sure to communicate with your collaborators to avoid conflicts or overlapping changes.
Replit Paid Subscription: Features and Benefits
Are you looking to unlock the full potential of Replit? Consider upgrading to a paid subscription. With a paid subscription, you’ll have access to a host of premium features that can take your coding experience to the next level.
Here’s what's included with the Replit paid subscription:
Increased resource limits
With a free account, you’re limited to 500 MB of storage and 500 MB of RAM. However, with a paid subscription, you can get up to 10 GB of storage and 10 GB of RAM, allowing you to create a large and more complex project.
Custom domain
Paid subscribers can map their custom domains to their Replit projects, which is a great way to establish a unique online presence.
Collaboration features
With a paid subscription, you can invite an unlimited number of collaborators to your project. This makes it easy to work with others, share ideas, and build together.
Priority support
Paid subscribers get access to priority support, meaning you'll get help with any issues or questions faster than free users.
live coding session
One of the coolest features of paid subscriptions is the ability to host live coding sessions with others. This is a great way to showcase your skills, get feedback on your code, and learn from others.

Conclusion
In conclusion, Replit is a fantastic tool for beginners who are just starting to learn how to code, as well as experienced developers who are looking for a powerful yet easy-to-use development environment. Whether you're working on a personal project or collaborating with others on a team, Replit has everything you need to write, run, and deploy your code all in one place. So why not give it a try and see how it can help you take your coding skills to the next level?
At Replit, lets bring the next billion software creators online.
